
Most beginner mistakes are adjustable long before they become plant disasters.
A newly installed LED can make every pale leaf or curled edge feel alarming. In practice, light stress usually builds over days, as the plant receives more intensity or longer exposure than it can use—not in the few minutes after the switch is turned on.
There is no single safe height or dimmer percentage for every setup. A young cutting, a mature tomato, and a shade-loving houseplant respond very differently, and the same fixture changes with hanging distance and daily runtime. Start a little gentler than seems necessary, then watch new growth for a week. Healthy new leaves tend to stay normally shaped and coloured; persistent upward curl, bleaching nearest the lamp, or stalled growth suggests backing off. Small changes—raising the light, dimming it, or shortening the day—are easier on a plant than repeated dramatic adjustments.
- Change only one variable at a time, then allow several days before judging the result.
Decide whether more light is needed
A grow light is useful when the plant is receiving less usable light than it needs, not simply because a fixture promises high wattage or an impressive-looking spectrum. A pothos that stays healthy near a bright window may gain little from extra light; a basil plant stretching on a dim winter sill has a clearer deficit.
Season changes the calculation. Window light is usually weaker and shorter in winter, while summer sun can be strong enough to make added light unnecessary—or excessive. The case for adding an LED to ordinary houseplants is strongest when growth slows, stems become leggy, new leaves shrink, or a plant sits far from any bright window.
Start with the growing goal
Supplemental light makes the most sense for a specific outcome:
- Keeping foliage compact in a low-light room
- Growing herbs or seedlings that need steady, stronger light
- Supporting active growth through short winter days
It is less essential for simply keeping tolerant houseplants alive. First note the plant’s location, seasonal daylight, and recent growth. Then add a modest light schedule and watch new growth for several weeks. A lamp should fill a measurable gap, not turn a healthy windowsill into a brighter experiment.
The Numbers That Matter Before Buying
Wall watts
This is electricity drawn from the outlet, not a direct measure of plant-usable light. It is still useful for comparing similarly designed fixtures and estimating heat and running cost; a 10-watt clip lamp will rarely serve the same area as a 100-watt panel.
Coverage area
Coverage is the footprint receiving useful light at a stated hanging height. Treat a maker’s largest coverage claim as a low-light zone, not a promise for seedlings or fruiting plants; raising a fixture widens the patch but weakens it.
PPFD
PPFD measures plant-usable photons landing on a surface, in µmol/m²/s. It makes comparisons more meaningful when the height and map are stated, but beginners can check whether output seems plausible without a PAR meter by watching growth and avoiding dramatic changes.
Full spectrum
Usually this means a broad mix of wavelengths that looks white or slightly pink. It is not a brightness rating, a guarantee of good coverage, or proof of quality; the claim deserves a closer look when it is the only specification offered.
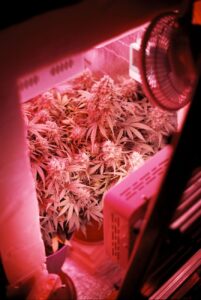
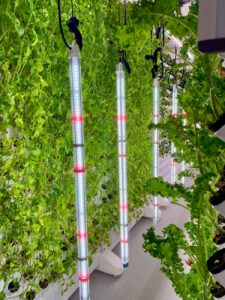
Choose Coverage Before Chasing Power
- Match the fixture’s shape to the growing area
A square board suits a square tent, while a long bar or strip fixture spreads light more evenly across a shelf. For compact enclosures, compare fixtures sized for a 2×2 tent without wasted output rather than buying by wattage alone.
Look forA stated coverage area that matches the bed, tent, or shelf shape.AvoidOne intense central light expected to cover a broad rectangle. - Check the edges, not only the center
A bright center can make plants at the perimeter lean inward and stretch. Raising the fixture to reach the edges may then leave the middle too weak, while lowering it to help the center can stress the nearest leaves; a properly sized 4×4 fixture prevents that trade-off.
Look forSimilar brightness across the outer pots and the center.AvoidCorrecting dim edges by running a small fixture excessively close. - Choose adjustment room
A dimmer and adjustable hanging height make a slightly capable fixture easier to start gently and refine later. Long shelves often benefit from several smaller, independently positioned lights; see options that reach plants along a shelf rather than leaving end plants behind.
Look forA dimmer, accessible controls, and height adjustment.AvoidA fixed-output fixture with no practical way to soften light. - Support the light as carefully as the plants
Use hardware rated for the fixture’s weight, secure both hanging points, and keep cords from bearing weight or touching wet areas. A stable fixture is safer and prevents accidental changes in distance after watering or pruning.
Look forRated hangers, a solid anchor, and a drip-free cord route.AvoidClips, adhesive hooks, or a single loose support point.
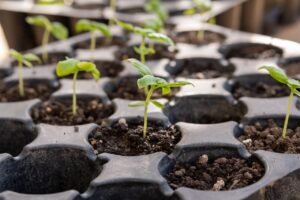
Install the light gently
- Secure the fixture first
Use rated hangers, a stable support, and a drip-free cable route. The fixture should not sway into foliage or rest on a tent frame that can shift.
- Center it over the canopy
Aim the fixture at the middle of the leaf area, not at one tall plant or a bare corner. Raise shorter pots if an even canopy is needed.
- Start at the maker’s conservative distance
Use the gentler end of the manufacturer’s seedling or early-growth guidance. For more detail on when a fixture is too near, see how to judge safe LED spacing.
- Dim before moving closer
If the fixture has a dimmer, begin at a reduced setting and hold it there for several days. This makes the first response easier to read.
- Treat lowering as a real adjustment
Moving a light down can sharply increase intensity at the leaves, even when it only moves a few inches. Change height or power—not both—and watch the newest growth.
Check hangers and height again after watering, pruning, or rearranging pots.
Light spreads out quickly with distance, so lowering an LED concentrates more energy on the canopy. A plant can appear fine for several days before pale patches, upward-cupped leaves, or stalled new growth show up.
When extra light seems necessary, make one small change, then allow time to observe it. Raising the fixture or reducing the dimmer is usually the safer correction.
Let the timer create a real night
A grow light should not run around the clock. Plants use darkness as part of their daily rhythm, and a timer prevents accidental marathon sessions after busy days. More importantly, the same on/off schedule makes changes easier to diagnose: if new leaves pale, curl, or stall, the likely causes are not hidden behind a constantly changing routine.
For many foliage houseplants, 10–12 hours of light is a cautious starting point. Seedlings and plants grown chiefly under LEDs may do well closer to 14–16 hours, provided the fixture is gentle enough and growth remains healthy. The practical details behind choosing how long lights should stay on depend on plant type, light intensity, and daylight from a window.
Adjust one small step at a time
Set the timer for the same hours every day and preserve an uninterrupted dark period. After a week or two, assess new growth rather than old damaged leaves.
- Stretching or very slow growth may justify adding 30–60 minutes.
- Bleaching, upward-curling leaves, or dry-looking edges call for a shorter day or lower intensity.
- Avoid changing duration, height, and dimmer level together; one change gives a clearer answer.
A windowless setup is a small ecosystem
Plants can live and grow in a room with no window. The practical answer to whether LEDs alone can support plants in a windowless room is yes—but the lamp cannot compensate for every weak condition. A bright fixture over a crowded, still shelf often produces soft growth, lingering wet soil, or scorched leaves rather than faster progress.
Treat the shelf as one environment
Light should reach the whole canopy, not merely the centre plant. Leave space between pots so air can move and so lower leaves are not permanently shaded. A small fan on a gentle setting helps dry the surface after watering, but it should not bend stems continuously.
Heat deserves a quick check, especially with lights close to foliage. Touch the area near the leaves after the lamp has run for an hour; if it feels noticeably warm, raise or dim the fixture. Watering also changes indoors: with no sun and limited airflow, pots may dry more slowly than expected. Check the mix below the surface rather than watering by calendar.
Finally, make the arrangement easy to inspect. Rotating pots, checking leaf undersides, and removing dead leaves are much simpler when plants are not packed wall to wall.
Read the Direction of the Symptoms
Stretching means the plant is reaching for stronger or more even light.
Long gaps between leaves and leaning toward the fixture point to low intensity or poor coverage. A closer look at leggy seedlings helps separate normal early growth from a real light gap.
Bleaching, upward curl, or dry patches nearest the LEDs suggest excess light or heat.
Nutrient issues often follow a leaf-age or vein pattern; light stress is strongest on the exposed top side. Early leaf-burn signs are easier to correct than crisp damage.
Change one light variable, then watch the newest growth for a week.
Raise the fixture or dim it—never both at once—so the response has a clear cause.
At the same time each week, inspect the newest leaves, the center of the canopy, and the edges. A quick photo makes subtle paling, curling, or renewed stretch easier to notice.
If symptoms worsen after a lighting change, return to the last gentle setting rather than adding fertilizer, water, and more light adjustments at once.
A simple first-week light check
- Record day one
Photograph the plant, note the fixture height, dimmer setting, timer hours, and the condition of the newest leaves.
- Check the most exposed leaves daily
Look at the upper canopy for bleaching, upward curl, dry-looking patches, or unusually pale new growth.
- Compare new growth after several days
Older damage rarely disappears; the useful signal is whether fresh leaves emerge normally.
- Ease off before making bigger changes
At the first sign of stress, raise the fixture or dim it slightly. Shorten the light period only if those changes are not enough.
- Change one setting, then wait
Make a small adjustment and give the plant a few days before judging it.
Keep the notes beside the timer or in a phone photo album; the record makes small trends easier to spot.
Small adjustments beat dramatic fixes
- The top leaves are the early warning system.
- Fixture height and dimming are the safest first responses to suspected excess light.
- A short record turns guesswork into a repeatable routine.
LED growing becomes far less intimidating when the setup is treated as an observation cycle: record the starting conditions, watch the exposed growth, and make one modest change at a time. When a plant looks stressed, raise or dim the light first rather than chasing a fast cure with several changes at once.
