
A bright LED may sip power, yet still be defeated by bad heat management or unstable current.
A 9-watt LED lamp can light a room corner while staying far cooler than an old incandescent—but put that same lamp inside a tight, unventilated shade and its life can shorten dramatically. It may also buzz, flicker on a dimmer, or simply stop working long before its advertised rating.
That apparent contradiction makes sense once an LED is treated as an electronic system, not a smaller version of a filament bulb. The light-emitting diode needs carefully controlled current; a driver provides it, while the lamp body and heat sink move unwanted heat away from the diode. The diffuser, circuit board, enclosure, and even the dimmer switch can affect the result. Low wattage means less energy is consumed overall, not that heat, electrical quality, or component design no longer matter.
- Most of an LED’s input energy still becomes heat rather than visible light; it is simply far more efficient than an incandescent lamp.
Light from a semiconductor junction
An LED makes light at a semiconductor junction, where two specially treated layers meet. When a driver pushes current across that junction, electrons and “holes” recombine. In the process, some energy is released as photons—the small packets that make visible light.
This differs from an incandescent lamp, which sends current through a thin filament until the filament becomes hot enough to glow. An LED does not need to heat a metal wire to incandescence, so it can produce far more light from the same electrical power.
How a white LED is made
The semiconductor chip in most household “white” LEDs is actually blue. A coating of phosphor sits over the chip and absorbs part of that blue light, then re-emits it as broader yellow, green, and red wavelengths. The remaining blue combines with the converted light and appears white. Some designs use a near-UV chip and several phosphors instead.
The phosphor blend helps determine whether the lamp looks warm or cool and how faithfully it renders colors.
Why heat still matters
Not all electrical energy becomes light. Losses in the junction, phosphor, driver, and wiring become heat, concentrated in a small area near the LED chip. A metal heat sink, lamp body, or fixture must carry that heat away. Excess temperature gradually reduces light output and can shorten both LED and driver life.
The parts that turn power into usable light
LED chip and phosphor
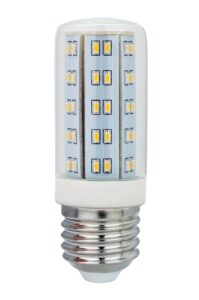
The chip is the tiny semiconductor that produces light when the driver supplies controlled current. Most white LEDs use a blue chip coated with phosphor, which converts part of that blue light into broader, white-looking light.
LED board
One or more chips are mounted on a circuit board, often a metal-core board that also carries heat away. In a replaceable bulb, this board sits inside the bulb’s own package; in an integrated fixture, it may be a long strip, a panel, or several modules.
Optics and diffuser
A clear lens, reflector, or frosted cover directs and softens the light. These parts determine whether a fitting produces a focused beam, an even wash across a panel, or glare-prone points of light.
Driver
The driver converts incoming mains power into the low-voltage, regulated current LEDs need. It may be built into a bulb, hidden in a fixture body, or installed separately; dimming only works when the driver and control method match.
Housing and heat sink
The metal body or finned heat sink spreads heat from the LED board into surrounding air, while the housing protects wiring and shapes the fixture. Many integrated fittings are sealed assemblies, so a failed driver or LED module may not be replaceable even when the light source is rated for a long life.
From wall power to controlled current
Household mains supply is alternating current (AC), typically at a voltage far too high and variable for an LED chip. Inside a bulb, strip supply, or fixture, the driver first rectifies AC into DC, then limits and regulates the output. The chip receives the small, controlled current it needs rather than a direct connection to the wall.
A good driver matters from the instant a lamp is switched on. It helps prevent damaging current surges, keeps brightness steadier as line voltage changes, and can include protection against overheating or faults. In many products, it is a small circuit hidden in the lamp base or fixture; larger fixtures may use a separate, replaceable driver.
Dimming also depends on this electronics. A dimmer and driver must interpret the control signal together; an incompatible pair may cause flicker, buzzing, a limited dimming range, or failure to turn fully off. When a light pulses, starts late, or dies while its LED board appears intact, the driver’s role in common light failures is often worth checking.
Drivers produce some heat themselves, so enclosing one tightly or exceeding its rated load can shorten its life. Current rating, voltage range, dimming compatibility, and ventilation are practical details worth matching when replacing a driver.
The supply must match the LED
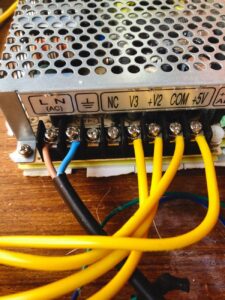
Many LED modules, downlights, and high-power chips use a constant-current driver. Its label may state an output such as 700 mA and a voltage range, such as 24–42 V. The current rating must match the module specification; the module’s combined forward voltage must fall inside the driver’s range.
A constant-voltage supply holds a fixed output—commonly 12 V or 24 V. It is intended for compatible LED strip, which contains its own current-limiting parts. Connecting a bare LED module to a 12 V or 24 V supply can push excessive current through it very quickly.
Before replacing a driver or supply, compare the labels:
- Output type: constant current or constant voltage
- Voltage/current rating: exact current for modules; exact voltage for strip
- Load range: the connected LEDs must sit within it
- Capacity: supply wattage must exceed the strip’s total wattage, with some headroom
A 24 V strip on a 12 V supply will usually be dim or fail to light; a 12 V strip on 24 V may be damaged. Matching these numbers is not a refinement—it prevents unreliable operation and early failure.

LEDs make heat—just in a different place
An LED does not run cool simply because its beam contains little infrared. Some input power becomes light; the rest becomes heat at the semiconductor junction, the tiny active area inside the LED chip. That heat must keep moving, or the junction temperature rises even when the outside of the lamp feels only warm.
The usual route is junction → metal pads on the circuit board → housing or heat sink → surrounding air. A metal-core board and finned aluminum body offer a broad, conductive path; airflow carries the heat away from the outer surface. In a small sealed bulb, recessed can, or tightly packed fixture, that last step is often the weak link.
What trapped heat changes
High junction temperature gradually reduces light output and can shift the phosphor’s color, making white light look less consistent over time. It also stresses the driver, capacitors, solder joints, and LED materials. The result may be earlier dimming, flicker, or a shorter working life rather than an immediate failure.
Many fixtures include thermal protection. When heat builds, the driver may lower current—seen as dimming—or switch off until the unit cools. For a lamp that works briefly and then goes dark, follow this troubleshooting path for heat-related shutoff before assuming the bulb itself is defective.
Practical checks are simple: keep heat-sink fins uncovered, avoid insulating material around fittings not rated for it, leave ventilation space, and use enclosed-fixture-rated lamps where an enclosure is unavoidable. A higher wattage equivalent in the same cramped fitting can create more heat than its label suggests.
A heat sink may become hot during operation. Persistent dimming, cycling off, or a noticeably discolored housing points to a heat-management problem.
Four numbers that describe different things
Watts measure electrical power draw; lumens measure the visible light produced.
For replacement bulbs, compare lumens first. Two 10-watt LEDs can have noticeably different output, especially across fixture styles.
Kelvin describes the appearance of white light, from warm yellowish white to cooler bluish white.
Warm 2700K–3000K often suits bedrooms and living areas; 4000K–5000K can make utility and task areas feel crisper. Check lumens separately.
Color Rendering Index (CRI) indicates how naturally colors appear under that light.
An 80 CRI lamp is common for general lighting. Around 90 CRI is worth seeking where food, paint, fabrics, skin tones, or detailed work need to look right.
Brightness, color temperature, and CRI answer separate questions.
Choose lumens for the amount of light, Kelvin for the room’s mood and task, and CRI for faithful color. Then check wattage for running cost and fixture limits.
Reading LED trouble signs safely
Patterns worth noticing
Flicker or buzzing that occurs only when dimmed, while the lamp is steady at full output, often points to dimmer compatibility or a low-end dimmer setting. A light that dims, blinks, or shuts off after several minutes and returns when cool more often suggests trapped heat. Check for blocked vents, insulation packed around a recessed fitting, or a bulb enclosed against its rating.
If one light is intermittent while others on the circuit are normal, a loose bulb, plug, or accessible connector is possible. An integrated fixture that is dead or erratic can have a failed driver, though its condition cannot be proved by looking at it.
After switching off the circuit breaker and allowing the lamp to cool, it is reasonable to reseat a replaceable bulb and clear dust from external vents. Opening a driver compartment, ceiling box, or fixture wiring—and any live testing—belongs to a qualified electrician.
A warm housing is normal. A scorching smell, discoloration, or repeated breaker trips is not; leave the circuit off and arrange an inspection.

Choose the light as a system
- Useful light, not a wattage number
Compare lumens and beam spread for the task: a narrow beam can look bright while leaving a work surface unevenly lit.
Look forLumens and beam angle suited to the spaceAvoidTreating equal watts as equal brightness - Comfortable colour
Kelvin sets the white appearance; CRI helps colours look natural. Kitchens, artwork, and mirrors often benefit from stronger colour rendering.
Look forA Kelvin and CRI specification, not vague “daylight” wordingAvoidBuying colour by package appearance alone - Compatible controls and location
A dimmable lamp still needs a compatible LED dimmer. For enclosed, damp, or outdoor positions, check the fixture’s stated rating and ventilation requirements.
Look forExplicit dimmer and enclosure suitabilityAvoidPutting a general-purpose lamp in a sealed fitting - A repair path
A replaceable-bulb fixture usually makes a failed light source cheap to swap. Integrated fittings can be neat and efficient, but driver or LED failure may mean replacing a part—or the whole fixture.
Look forAvailable replacement bulbs, drivers, or warranty supportAvoidAssuming an integrated fixture is maintenance-free

Long life is designed, not promised
- Prioritize the required light level, colour, and beam before comparing wattage.
- Treat a vague lifetime claim cautiously when heat handling and driver details are absent.
An LED is not just a chip that happens to glow. Its driver, thermal path, enclosure, and controls determine whether that light stays stable for years.
A modestly priced, well-matched lamp in an open fixture can outlast a higher-priced model trapped in heat or paired with the wrong dimmer. Choose by the complete installation, then keep the packaging and warranty details for future replacement.
